
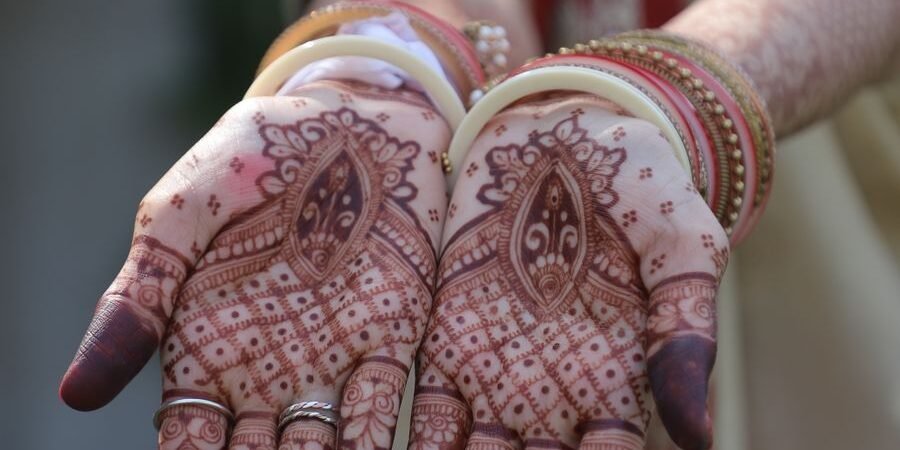
A bride’s hands carry more than decoration on her wedding day. They hold the bouquet, exchange rings, and appear in almost every close-up photograph, from the first look to the last dance. That is why bridal mehndi designs are planned weeks in advance, applied over several hours, and talked about long after the music stops. A good dulhan design is not simply a bigger version of a party design: it is built to cover the hands and forearms, to stay dark through days of ceremonies, and to sit comfortably against a lehenga, saree, or gown that may weigh several kilos.
This article walks through the main bridal styles, what each one actually looks like on the skin, how to pick a design that suits your outfit and your schedule, and the practical details brides often only learn the hard way: how long the sitting takes, when to book, what it costs, and how to keep the colour deep for the wedding and the days after. It also covers the small decisions — fingertip shading, wrist coverage, a hidden name or date — that make a design feel personal rather than copied from a catalogue.
What Makes a Design Bridal?
Three things separate bridal henna from everyday henna. Coverage is the first: a bridal design usually runs from the fingertips to at least mid-forearm, on both the front and back of the hands, with the palms filled in dense detail. Detail is the second: bridal work uses fine lines, tiny dots, and layered patterns — jaali netting, paisley chains, floral borders — that take a skilled hand and a lot of patience. The third is staying power: bridal paste is left on far longer, often overnight, because the stain needs to survive the wedding, the reception, and often a post-wedding event as well.
None of that means every bride needs the heaviest design available. Some brides choose a slightly lighter bridal style so they can move, eat, and dance more easily, or because their outfit is already heavily embroidered. The right bridal design is the one that matches your ceremonies, your outfit, and your tolerance for sitting still — not the densest pattern in the artist’s portfolio.
Bridal Styles, Explained on the Skin
Traditional Rajasthani and Marwari Work
This is the style most people picture when they hear the word dulhan. Both palms are filled with dense, symmetrical patterns: a central figure or mandala, surrounded by peacocks, paisleys, and floral bands, with the fingers fully shaded and the design climbing the forearm in bordered panels. It is highly detailed and takes the longest to apply, often five to eight hours for both hands and arms. It suits brides who want the classic, photographed-from-every-angle look and who have a full day free before the wedding.
Arabic Bridal, with Breathing Room
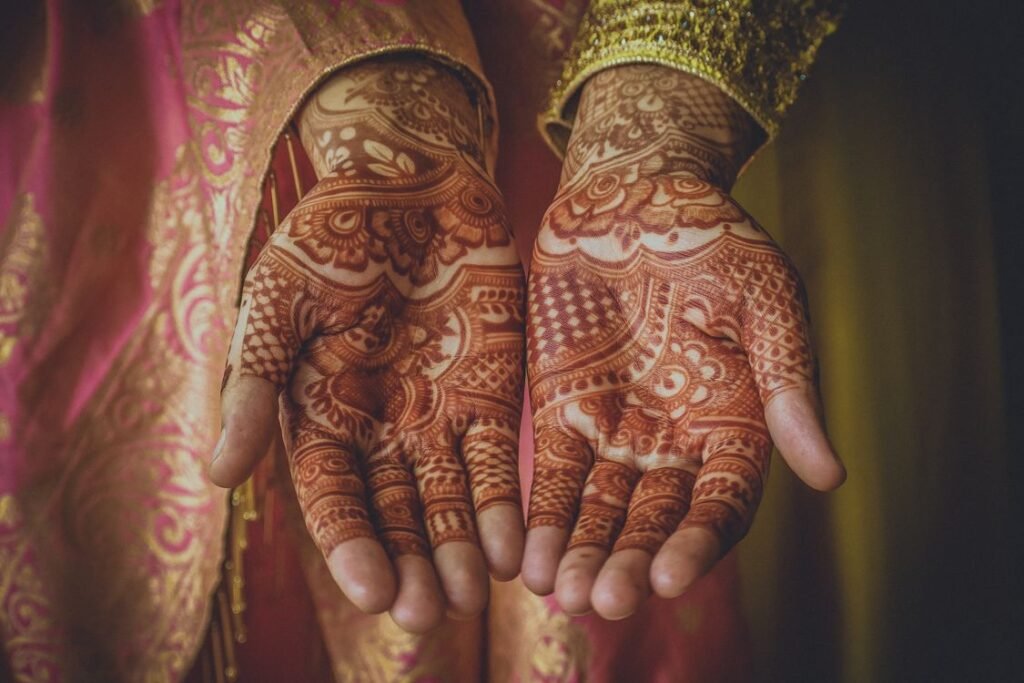
Arabic bridal keeps the flowing vines and large flowers of Arabic party henna, but builds them up with more layers, shading, and wrist and forearm work. Skin still shows between the motifs, which makes the dark flowers stand out and keeps the design feeling lighter than a fully filled palm. It is a good middle ground for brides who want drama without a full day in the chair, and it photographs well against both bright and pastel outfits.
Indo-Arabic: Dense Palms, Flowing Backs
Indo-Arabic combines the two approaches: the palms are dense and detailed, while the backs of the hands use flowing Arabic vines and open flowers. Many brides choose this because the palms look rich in the ring-exchange photographs, while the backs look graceful in the wider shots. It also gives the artist a natural break: the dense palm work and the lighter back work use different skills and paces.
Figure and Portrait Motifs
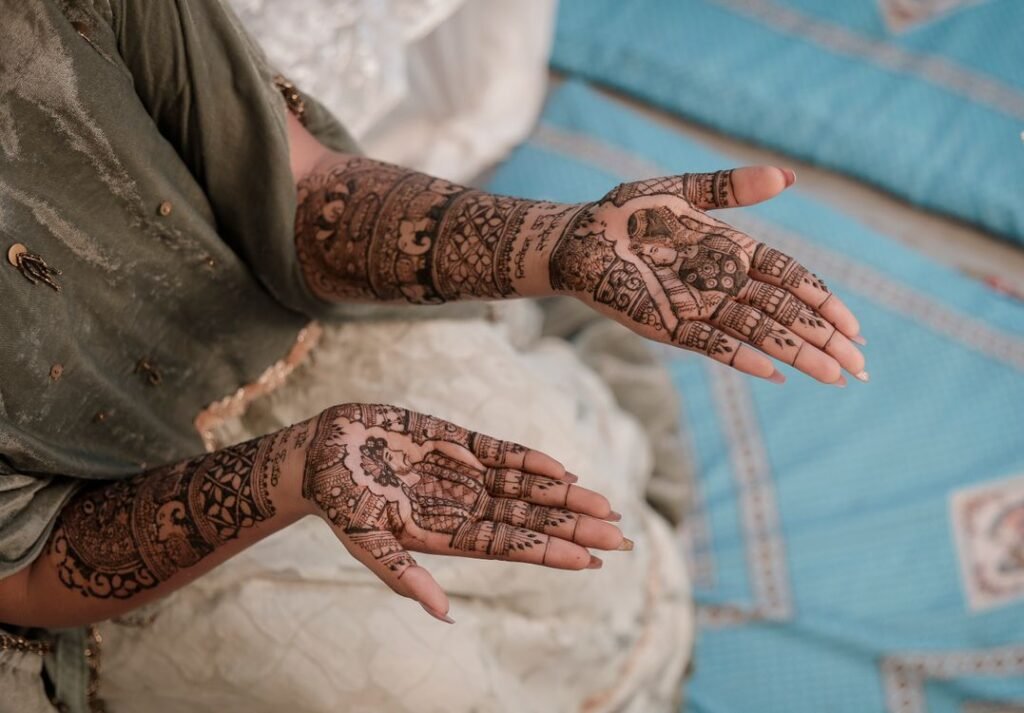
Some bridal designs include small figures — a bride and groom, a palanquin, a peacock pair, or a scene from the couple’s story — woven into the palm or forearm. These are the most personal motifs, and also the most demanding: a figure that is slightly out of proportion is hard to hide. Ask to see the artist’s own figure work, not just a saved photograph, and agree on exactly where the figure will sit before the paste starts. A figure on the forearm is easier to display in photographs than one hidden in the centre of the palm.
Jaali, Peacocks, and Paisley Borders
Jaali netting, peacocks, and paisley borders are the building blocks that fill the space between larger motifs. Jaali adds texture across the forearm and the back of the hand; peacocks add a traditional, celebratory shape on the palm or wrist; paisley borders frame the design and stop it from looking unfinished at the edges. In a well-planned bridal design, these elements repeat in a rhythm, so the eye moves across the whole arm without getting stuck on one crowded patch.
A Lighter Bridal Option
Not every bride wants full coverage. A lighter bridal design keeps the palms and backs detailed but leaves more open skin on the forearm, or stops at the wrist instead of climbing to the elbow. This suits smaller weddings, brides who work with their hands, and anyone who finds a long sitting uncomfortable. It still reads as bridal in photographs, especially with dark fingertips and a strong wrist border, and it is easier to live with in the days after the wedding. For guests and family members who want something simpler, our guide to simple mehndi designs covers easy henna ideas for front and back hands.
Bridal Mehndi Designs at a Glance
| Bridal style | Coverage | How it feels in the chair | Sitting time, both hands | Suits best |
|---|---|---|---|---|
| Traditional Rajasthani / Marwari | Fingertips to mid- or upper forearm, dense | Long, detailed, symmetrical | 5–8 hours | Classic weddings, full ceremony days |
| Arabic bridal | Hands and wrists, some forearm | Flowing, with open skin | 3–5 hours | Brides who want drama without full density |
| Indo-Arabic | Dense palms, flowing backs | A mix of dense and open work | 4–6 hours | Photographs from both palm and back angles |
| Figure / portrait bridal | Palms and forearms, with a central figure | Very detailed, needs a specialist artist | 6–9 hours | Couples who want a personal story in the design |
| Jaali-heavy bridal | Hands and forearms, net texture throughout | Even, repetitive, slow detail | 5–7 hours | Brides who love texture and symmetry |
| Lighter bridal | Hands, wrists, short forearm | Shorter, easier to live with | 2–4 hours | Smaller weddings, busy schedules, second events |
Choosing a Design That Fits the Outfit
Start with the outfit’s weight and colour, because the henna has to live next to it for hours. A red or maroon lehenga with gold embroidery pairs naturally with a dense, traditional design and a very dark stain, since the henna, the embroidery, and the jewellery are all speaking the same rich language. A pastel lehenga or a light pink saree, on the other hand, can be overwhelmed by an extremely dark, dense design; a slightly more open Arabic or Indo-Arabic pattern, with the stain at a deep reddish-brown rather than near-black, often sits better against soft colours.
Sleeve length matters more than most brides expect. If your blouse or kameez has long, fitted sleeves, henna up to the elbow will mostly be hidden, so it makes sense to concentrate detail on the hands and wrists and keep the forearm work simpler. With short sleeves or sleeveless blouses, the forearm becomes part of the look, and a bordered panel design that runs cleanly to mid-forearm photographs beautifully. Check the outfit’s neckline and dupatta draping too: a design that climbs high on one forearm may be covered by a dupatta in most photographs, while the other arm stays visible.
Jewellery is the third piece. Heavy bangles and a haath phool (hand chain) frame the henna rather than covering it, so leave the wrist area slightly less dense where a bangle stack will sit, or ask the artist to work the design around the bangle line. If you are planning the whole wedding week’s colours as one story, it helps to think about henna alongside the other outfits too — for example, our guide on how to try a trend colour without rebuilding your closet is useful for keeping a reception or post-wedding outfit in the same colour family without buying a completely new wardrobe.
When to Book, and How the Day Itself Runs
Book a popular bridal artist two to four months before the wedding, and earlier for peak season dates in November, December, and the spring wedding months. When you enquire, send photographs of designs you like, your outfit colour, and the exact dates of the wedding and any pre-wedding events. A good artist will tell you honestly whether your chosen design fits the time you have, and will suggest a trial or a smaller test design if you have never had henna before.
Apply bridal henna two days before the wedding if you can. That gives the stain a full day to deepen from orange to reddish-brown, and leaves a buffer if the sitting runs long or a small section needs a touch-up. One day before is common and works, but it leaves less room for the colour to mature before the photographs. Three days before is also fine, though the stain will be slightly past its peak by the wedding day if you wash your hands a lot in between.
On the day, plan for a long, still sitting: wear a loose, front-opening top so the artist can reach your forearms, keep your phone, water, and snacks within reach, and arrange help for eating and for the bathroom, because your hands will be covered in paste. Most artists work on one hand, then the other, with a short break in between. The paste needs to dry fully before you move around, and it should stay on for at least eight hours — overnight is best for bridal work. Some brides sleep with cotton gloves over the dried paste to stop it flaking onto bedding.
How Long the Stain Lasts, and What It Costs
A bridal stain, properly cared for, is usually at its darkest on the wedding day and the day after, and remains clearly visible for two to three weeks, fading first from the backs of the hands and the fingertips. Palm stains last longer than back-of-hand stains. Swimming, frequent handwashing, and exfoliating will shorten the life of any design, so plan manicures, facials, and hair colouring before the henna, not after.
Costs vary widely by city, artist reputation, and design density. As a broad guide, a full bridal package — both hands to the forearm, front and back — often falls in the range of $200 to $600 in many cities, with well-known artists charging $800 or more, and simpler bridal designs starting around $120 to $200. A figure or portrait motif, extra forearm coverage, or a second artist for the feet usually adds to the price. Confirm in writing what is included: both hands and arms, front and back, feet if wanted, travel, and any touch-ups. Be cautious about very cheap bridal offers that use “black henna” or an unknown paste — natural henna stains reddish-brown, not jet black, and chemical black henna can cause burns and lasting skin damage.
Aftercare for a Deep Bridal Stain
Once the paste is dry, leave it alone. The most common reason for a pale bridal stain is impatience: washing hands, cooking, or changing clothes while the paste is still soft. Keep the paste on overnight if your artist advises it, then scrape it off in the morning rather than washing it off. Apply a thin layer of natural oil, keep the hands warm, and avoid water for several hours. A lemon-sugar sealant, dabbed gently over dried paste, can help the paste stay in place, but it should not be used so heavily that it drips or smudges the lines.
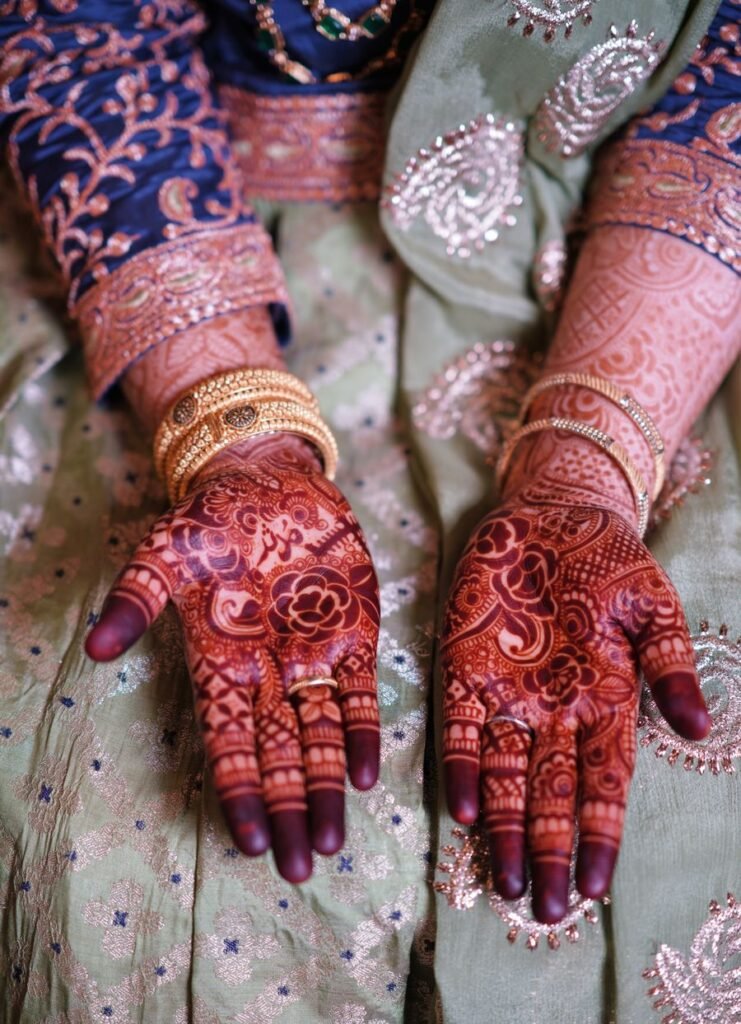
For the first two days, avoid soap on the decorated skin, skip swimming and long baths, and moisturise with oil rather than a scented lotion that contains alcohol. If you need to wash your hands, pat them dry quickly and re-oil. The colour will keep deepening for 24 to 48 hours, so judge the stain on the wedding day, not on the morning you remove the paste.
Mistakes Brides Make with Bridal Henna
- Booking an artist on price alone, without seeing their own bridal work on real hands.
- Choosing a design from a heavily filtered photograph, then being surprised by the natural reddish-brown colour.
- Applying henna the night before the wedding, leaving no time for the stain to deepen or for a touch-up.
- Using black henna, or a cone with no ingredient information, to get a darker colour faster.
- Planning a manicure, facial, or hair colour after the henna, which can fade or stain the design.
- Forgetting to eat, drink, and rest during a long sitting, then moving too soon and smudging wet paste.
- Hiding a figure or a name in a spot that will be covered by bangles or a dupatta in photographs.
Bridal Mehndi: Questions Brides Ask Most
How far in advance should I book a bridal mehndi artist?
Two to four months ahead is a safe window, and earlier for peak wedding-season dates. Popular artists book out quickly in November, December, and the spring months, so send your dates, outfit colour, and a few reference photographs as soon as the venue is confirmed.
When should bridal mehndi be applied?
Two days before the wedding is ideal for most brides: the stain has a full day to deepen, and there is still time for a small touch-up. One day before is common, but it leaves less room for the colour to mature. Three days before also works, though heavy handwashing in between can fade the stain slightly by the wedding day.
How long does a full bridal sitting take?
Expect three to eight hours for both hands, depending on density and coverage. Traditional dense work and figure designs sit at the longer end, lighter bridal work at the shorter end. Feet, if included, add another one to two hours, so many artists bring a second artist for the feet.
How much does bridal mehndi usually cost?
In many cities, a full bridal package for both hands to the forearm falls between $200 and $600, with well-known artists charging $800 or more and simpler bridal designs starting around $120 to $200. Figure work, extra forearm coverage, feet, and travel usually add to the price, so confirm exactly what is included before you pay a deposit.
Will bridal mehndi stain my outfit or jewellery?
Wet paste can transfer, so keep the paste away from light fabrics until it is fully dry, and do not wear your wedding jewellery during the sitting. Once the paste is removed and the stain has set, it will not rub off on clothing, though very pale fabrics should still be kept away from freshly oiled hands for a few hours.
Can I get bridal mehndi if I have sensitive skin?
Yes, with care: use only natural henna, do a patch test on the inner arm at least 24 hours before the full sitting, and tell the artist about any previous reactions. Avoid black henna entirely, and skip lemon-sugar sealant if your skin is easily irritated. If you have eczema or broken skin on the hands, discuss timing with the artist and, if needed, with your doctor.
A Short Checklist Before You Book
Before you pay a deposit, check these five points: the artist’s own bridal photographs, not just saved images; the exact coverage you are paying for, from fingertips to where on the forearm; the date, start time, and expected sitting length; whether feet, travel, and touch-ups are included; and the paste they use, with a patch test if you have sensitive skin. With those settled, the sitting itself becomes the enjoyable part — a few quiet hours before the wedding rush, with a design that will be in your photographs for years. For the smaller, finger-only details that often finish a bridal look, see our guide to finger mehndi designs.
Photograph note: the photograph in this article is a real bridal henna photograph from Pexels, showing full-hand bridal mehndi designs on a bride’s hands with dark fingertips and bangles. It is included as a reference for dense, full-hand dulhan work, rather than as a pattern to copy exactly.